Understanding Resource Allocation in Kubernetes with Kubectl Plugin

👋 Hi there! I'm Balaji S, a passionate technologist with a focus on AWS, Linux, DevOps, and Kubernetes.
💼 As an experienced DevOps engineer, I specialize in designing, implementing, and optimizing cloud infrastructure on AWS. I have a deep understanding of various AWS services like EC2, S3, RDS, Lambda, and more, and I leverage my expertise to architect scalable and secure solutions.
🐧 With a strong background in Linux systems administration, I'm well-versed in managing and troubleshooting Linux-based environments. I enjoy working with open-source technologies and have a knack for maximizing performance and stability in Linux systems.
⚙️ DevOps is my passion, and I thrive in bridging the gap between development and operations teams. I automate processes, streamline CI/CD pipelines, and implement robust monitoring and logging solutions to ensure continuous delivery and high availability of applications.
☸️ Kubernetes is a key part of my toolkit, and I have hands-on experience in deploying and managing containerized applications in Kubernetes clusters. I'm skilled in creating Helm charts, optimizing resource utilization, and implementing effective scaling strategies for microservices architectures.
📝 On Hashnode, I share my insights, best practices, and tutorials on topics related to AWS, Linux, DevOps, and Kubernetes. Join me on my journey as we explore the latest trends and advancements in cloud-native technologies.
✨ Let's connect and dive into the world of AWS, Linux, DevOps, and Kubernetes together!
Introduction:
In Kubernetes, efficient resource management is crucial for optimizing performance and ensuring stability within the cluster. To facilitate this, Kubernetes provides various tools and commands for monitoring and managing resource allocation. One such tool is the kubectl plugin that enables users to view resource allocations for CPU, memory, GPU, and other resources defined in the manifest of nodes and running pods. In this blog post, we will explore the functionalities of this plugin and how it can be used to gain insights into resource utilization within a Kubernetes cluster.
kubectlplugin lists allocations for resources (CPU, memory, GPU,...) as defined in the manifest of nodes and running pods. It doesn't list usage likekubectl top. It can provide results grouped by namespaces, nodes, and pods and filtered by resource name.
Overview of Columns: Before diving into the details, let's briefly review the columns displayed by the kubectl plugin:
Requested: This column represents the quantity of resources requested by the container in the pod's manifest. It aggregates the resource requests across pods, namespaces, and nodes where the container is running. Additionally, it provides the percentage of requested resources over what is allocatable in the group.
Limit: The limit column indicates the maximum quantity of resources that can be requested by the container in the pod's manifest. Similar to the requested column, it sums up the resource limits across pods, namespaces, and nodes. It also includes the percentage of resources requested over what is allocatable in the group.
Allocatable: This column displays the allocatable resources defined or detected on nodes within the cluster. It serves as the baseline for resource availability.
Free: The free column calculates the available resources by subtracting the maximum of either the limit or requested resources from the allocatable resources. It provides insights into the remaining resources that can be utilized within the group.
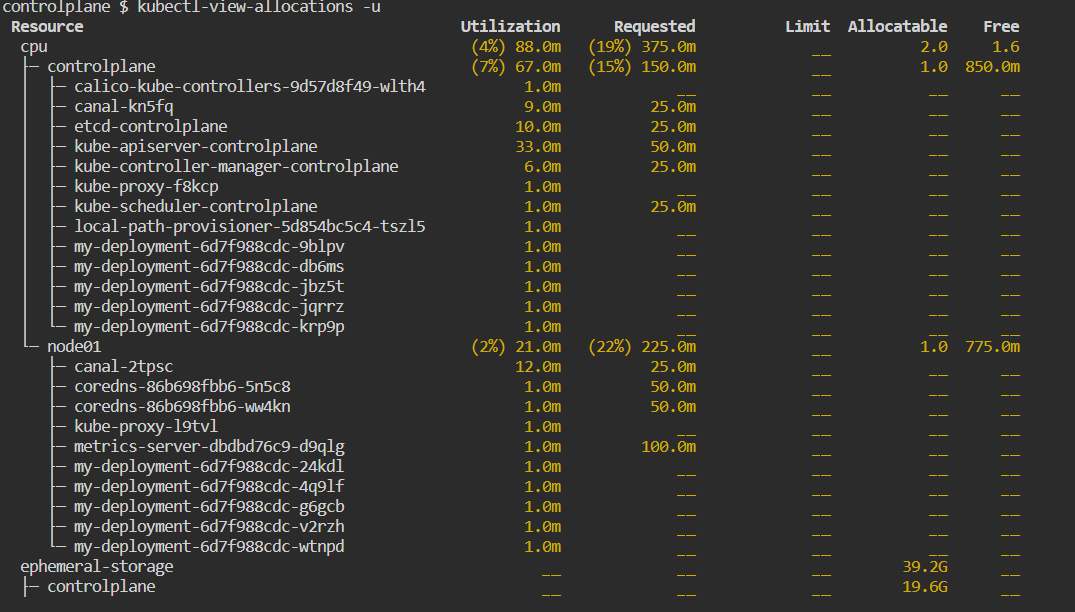
Utilization: Although optional and disabled by default, the utilization column shows the quantity of resources (CPU and memory) used, as reported by the Metrics API. This metric requires metrics-server to be set up in the cluster for accurate utilization information.
Install
Download from github's release or use the script (Use the latest version to check GitHub release)
curl https://raw.githubusercontent.com/davidB/kubectl-view-allocations/master/scripts/getLatest.sh | bash
Usage
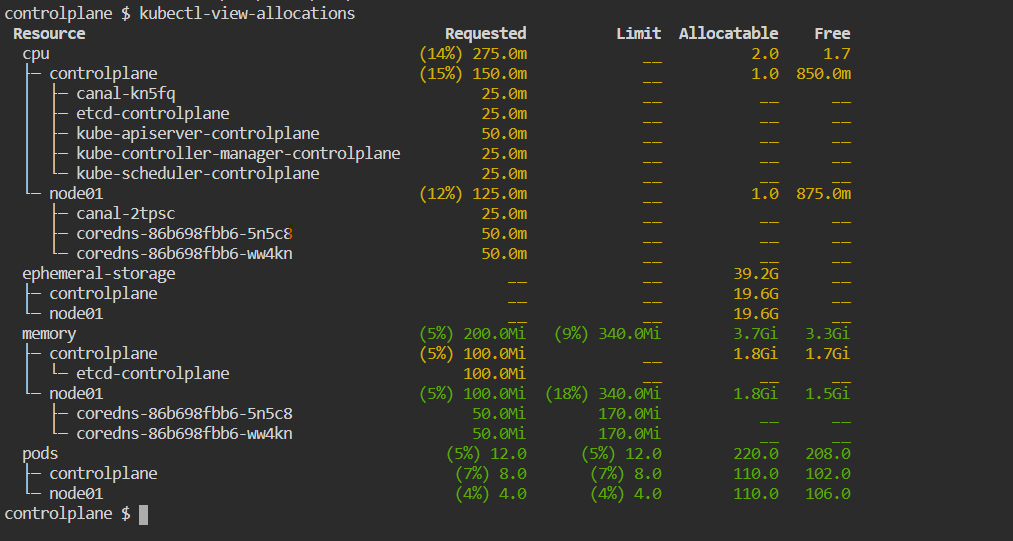
To help using, kubectl-view-allocations
kubectl-view-allocations
Output:
kubectl-view-allocations -h
Output:
kubectl plugin to list allocations (cpu, memory, gpu,... X utilization, requested, limit, allocatable,...)

Usage: kubectl-view-allocations [OPTIONS]

Options:
      --context <CONTEXT>              The name of the kubeconfig context to use
  -n, --namespace <NAMESPACE>          Show only pods from this namespace
  -u, --utilization                    Force to retrieve utilization (for cpu and memory), require to have metrics-server https://github.com/kubernetes-sigs/metrics-server
  -z, --show-zero                      Show lines with zero requested and zero limit and zero allocatable
      --precheck                       pre-check access and refersh token on kubeconfig by running `kubectl cluster-info`
      --accept-invalid-certs           accept invalid certificats (dangerous)
  -r, --resource-name <RESOURCE_NAME>  Filter resources shown by name(s), by default all resources are listed
  -g, --group-by <GROUP_BY>            Group information hierarchically (default: -g resource -g node -g pod) [possible values: resource, node, pod, namespace]
  -o, --output <OUTPUT>                Output format [default: table] [possible values: table, csv]
  -h, --help                           Print help
  -V, --version                        Print version

https://github.com/BalajiiBharath/kubectl-view-allocations.git
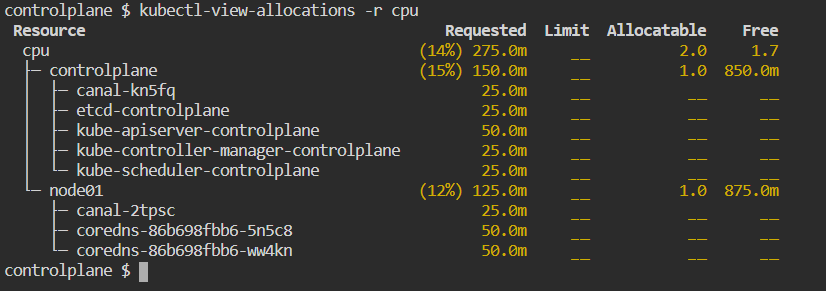
To view only CPU
kubectl-view-allocations -r cpu
Output:
Show GPU Allocation
kubectl-view-allocations -r gpuOutput:
 Resource                   Requested       Limit  Allocatable  Free
  nvidia.com/gpu           (71%) 10.0  (71%) 10.0         14.0   4.0
  ├─ node-gpu1               (0%)  __    (0%)  __          2.0   2.0
  ├─ node-gpu2               (0%)  __    (0%)  __          2.0   2.0
  ├─ node-gpu3             (100%) 2.0  (100%) 2.0          2.0    __
  │  └─ fah-gpu-cpu-d29sc         2.0         2.0           __    __
  ├─ node-gpu4             (100%) 2.0  (100%) 2.0          2.0    __
  │  └─ fah-gpu-cpu-hkg59         2.0         2.0           __    __
  ├─ node-gpu5             (100%) 2.0  (100%) 2.0          2.0    __
  │  └─ fah-gpu-cpu-nw9fc         2.0         2.0           __    __
  ├─ node-gpu6             (100%) 2.0  (100%) 2.0          2.0    __
  │  └─ fah-gpu-cpu-gtwsf         2.0         2.0           __    __
  └─ node-gpu7             (100%) 2.0  (100%) 2.0          2.0    __
     └─ fah-gpu-cpu-x7zfb         2.0         2.0           __    __
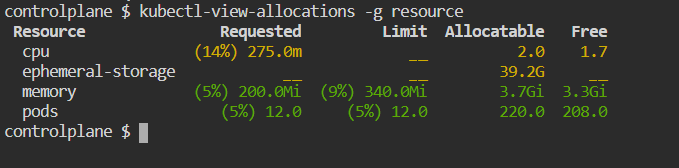
Overview only
kubectl-view-allocations -g resource
Output:
Show utilization
Utilization information is retrieved from metrics-server (should be set up on your cluster).
Only report CPU and memory utilization
kubectl-view-allocations -u
Output:
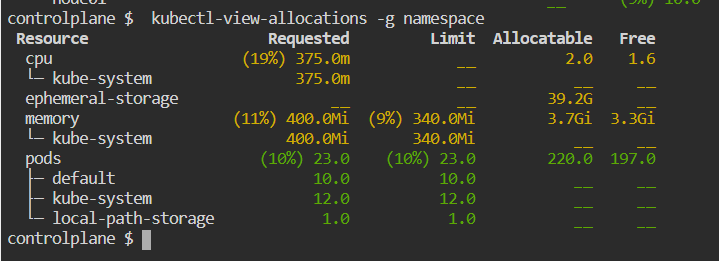
Group by namespaces
kubectl-view-allocations -g namespace
Output:
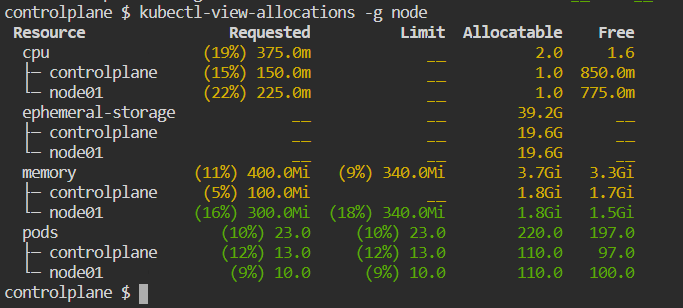
To check for nodes only
kubectl-view-allocations -g node
Output:
Conclusion:
The kubectl-view-allocations the plugin simplifies Kubernetes resource management by providing valuable insights into resource utilization. By leveraging this plugin, administrators and developers can identify and address resource bottlenecks more effectively, leading to improved performance and cost-efficiency within Kubernetes environments. Install the plugin today and take your Kubernetes resource management to the next level!
By following these steps, you'll be able to write a comprehensive blog post on installing and using the kubectl-view-allocations plugin in Kubernetes environments. Make sure to customize the content to suit your audience and provide any additional insights or tips you think may be helpful.


