

Introduction
When managing AWS EC2 instances, encountering a "1/2 checks passed" status check results can be a cause for concern. This status indicates that one of the two crucial status checks – system status check and instance status check – has failed. In this blog post, we'll delve into the significance of these checks, the potential issues they may uncover, and step-by-step troubleshooting methods to restore your EC2 instance to optimal health.
To view status checks
Open the Amazon EC2 console at https://console.aws.amazon.com/ec2/.
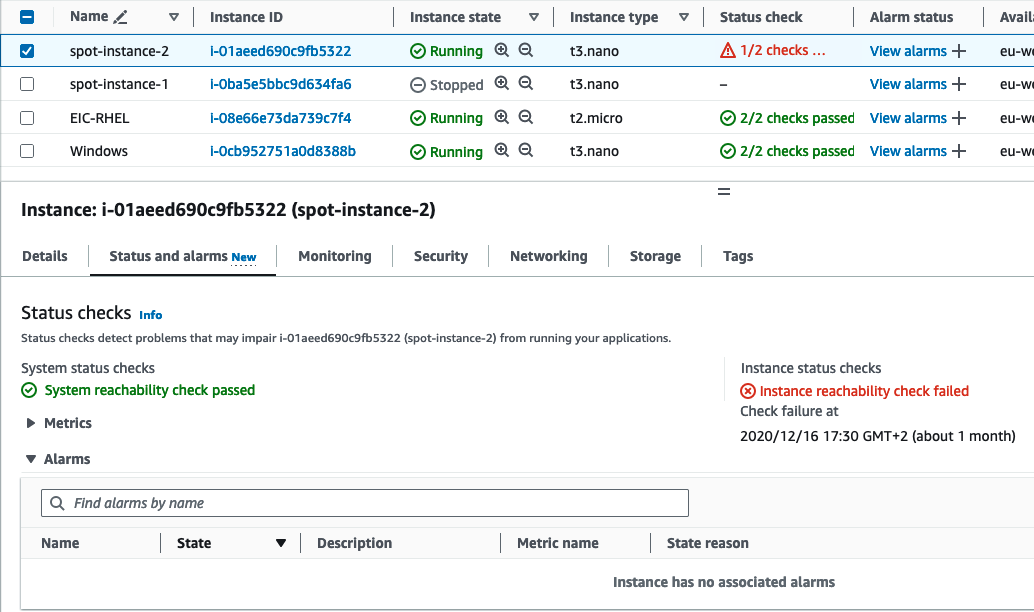
On the Instances page, the Status check column lists the operational status of each instance.
To view the status of a specific instance, select the instance, and then choose the Status and alarms tab
Understanding System Status Check
The system status check is designed to monitor the underlying health and functionality of the host system supporting your EC2 instance. Failures in this check could arise from network issues, hardware failures, or other infrastructure-related problems. To troubleshoot, navigate to the AWS Management Console, select your instance, and examine the "Status Checks" tab for reported issues related to system status.
The following are examples of problems that can cause instance status checks to fail:
Failed system status checks
Incorrect networking or startup configuration
Exhausted memory
Corrupted file system
Incompatible kernel
Deciphering Instance Status Check
On the other hand, the instance status check focuses on the health of the EC2 instance itself and its software configuration. Instances may encounter failures due to operating system issues, application failures, or other software-related problems. Similar to the system status check, investigate the "Status Checks" tab for alerts or error messages pointing to specific issues affecting the instance's health.
Common Troubleshooting Actions:
Reboot the Instance*:* A simple reboot can often resolve transient issues. Try stopping and starting the instance through the AWS Management Console or AWS CLI.
Review Logs: Connect to the instance using SSH (for Linux) or Remote Desktop (for Windows) and examine system logs for any errors or issues that may shed light on the cause of the status check failure.
Check Security Groups and Network ACLs: Ensure that the security groups and network ACLs associated with the instance allow necessary inbound and outbound traffic
Practical Steps for Troubleshooting:
AWS Console Check:
Open the AWS Management Console, go to EC2, and select your instance.
Check the "Status Checks" tab for detailed information on the failed check.

AWS CLI Check:
Utilize the AWS CLI to describe the instance status:
aws ec2 describe-instance-status --instance-ids YOUR_INSTANCE_IDReplace YOUR_INSTANCE_ID with the actual ID of your instance.
AWS CLI Reboot Command:
If a reboot is deemed necessary, execute the following AWS CLI command:
aws ec2 reboot-instances --instance-ids YOUR_INSTANCE_IDCreate and edit status check alarms
You can use the status check metrics to create CloudWatch alarms to notify you when an instance has a failed status check.
To create a status check alarm
Open the Amazon EC2 console at https://console.aws.amazon.com/ec2/.
In the navigation pane, choose Instances.
Select the instance, choose the Status Checks tab, and choose Actions, Create status check alarm.
On the Manage CloudWatch alarms page, under Add or edit alarm, choose Create an alarm.
For Alarm notifications, turn the toggle on to configure Amazon Simple Notification Service (Amazon SNS) notifications. Select an existing Amazon SNS topic or enter a name to create a new topic.
If you add an email address to the list of recipients or created a new topic, Amazon SNS sends a subscription confirmation email message to each new address. Each recipient must confirm the subscription by choosing the link contained in that message. Alert notifications are sent only to confirmed addresses.
For Alarm action, turn the toggle on to specify an action to take when the alarm is triggered. Select the action.
For Alarm thresholds, specify the metric and criteria for the alarm.
You can leave the default settings for Group samples by (Average) and Type of data to sample (Status check failed: either), or you can change them to suit your needs.
For the Consecutive period, set the number of periods to evaluate and, in Period, enter the evaluation period duration before triggering the alarm and sending an email.
(Optional) For Sample metric data, choose Add to Dashboard.
Choose Create.
If you need to make changes to an instance status alarm, you can edit it.
To edit a status check alarm
Open the Amazon EC2 console at https://console.aws.amazon.com/ec2/.
In the navigation pane, choose Instances.
Select the instance and choose Actions, Monitoring, and Manage CloudWatch alarms.
On the Manage CloudWatch alarms page, under Add or Edit alarm, choose Edit an alarm.
For alarm search, choose the alarm.
When you are finished making changes, choose Update.
Conclusion:
Effectively addressing AWS EC2 instance status check failures involves a systematic approach to identifying the check type, understanding the potential issues, and employing appropriate troubleshooting measures. By following the steps outlined in this comprehensive guide, you can diagnose and resolve status check failures, ensuring the continued reliability and performance of your EC2 instances in the AWS environment.