


Table of contents
Introduction
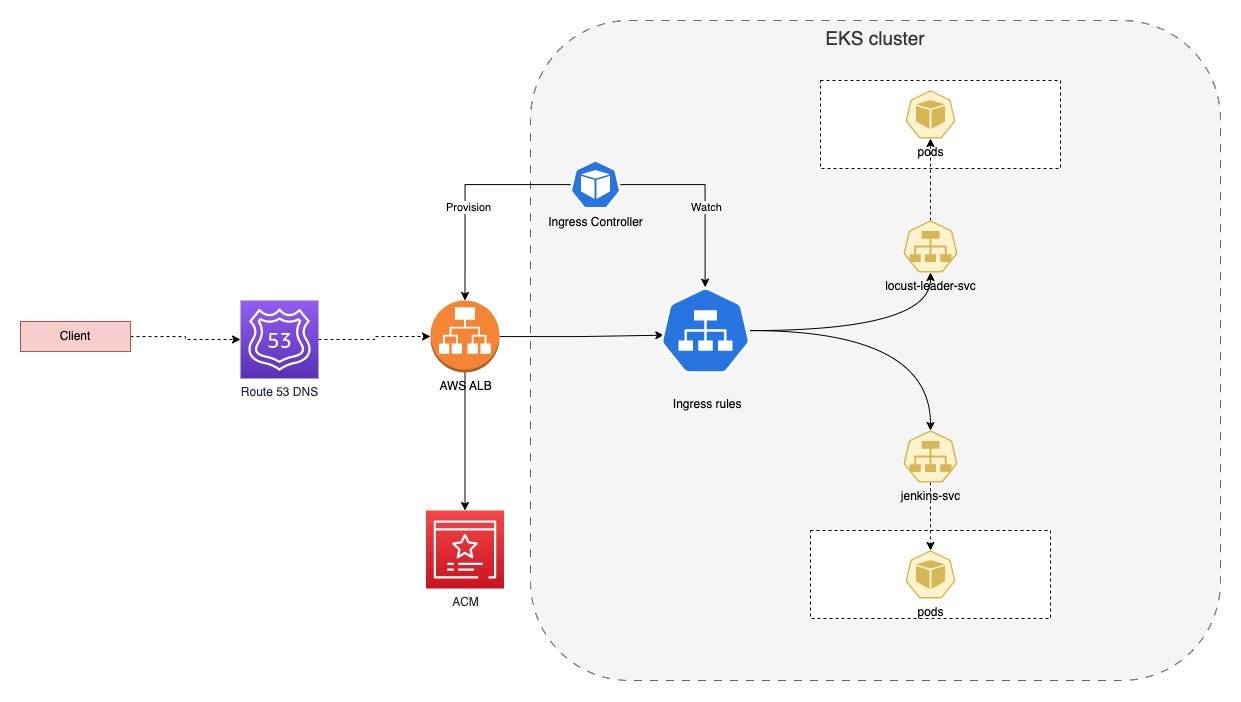
Welcome to this comprehensive guide on setting up an AWS Application Load Balancer (ALB) Ingress in a Kubernetes cluster running on Amazon EKS. This guide will walk you through each step, providing detailed explanations and ensuring a successful setup.
Prerequisites
1. EKS Cluster Setup
Ensure you have an Amazon EKS cluster created. If not, follow the official Amazon EKS documentation to create your cluster.
2. RDS Setup
Set up an Amazon RDS instance (Optional). This instance will be used to demonstrate connectivity between the EKS cluster and the RDS database.
3. Security Group Connectivity
Establish security group connectivity between your EKS cluster and RDS instance. This ensures that communication between the cluster and the database is secure.
4. EKS Controller Instance
Launch an AWS Linux instance to act as the EKS controller. This instance will be used to execute various commands and configurations for the EKS cluster.
EKS Controller Instance Setup
On the EKS controller instance, perform the following steps:
# Install required tools
sudo yum install make docker -y

# Install kubectl
# Refer to: Install and Set Up kubectl on Linux | Kubernetes

# Install eksctl
# Refer to: https://docs.aws.amazon.com/emr/latest/EMR-on-EKS-DevelopmentGuide/setting-up-eksctl.html

# Configure AWS CLI
aws configure

# Update kubeconfig file for EKS cluster
aws eks --region <your-region> update-kubeconfig --name <your-cluster-name>

# Create Docker registry secret
kubectl create secret docker-registry reg-cred --docker-server=docker.io --docker-username=username --docker-password=password--docker-email=dockerhub_email
# Install kustomize
curl -s "https://raw.githubusercontent.com/kubernetes-sigs/kustomize/master/hack/install_kustomize.sh" | bash -s -- 4.0.5
sudo mv kustomize /usr/local/bin/
kustomize version
The kubectl create secret docker-registry command is crucial for securely storing the credentials required to pull images from a private registry within your Kubernetes cluster.
Deployment File (deployment.yml)
A deployment in Kubernetes is a resource object that represents the desired state of your application. It defines how many replicas (instances) of your application should be running, what container images to use, and various other settings. The /k8s_manifest/deployment.yml file likely contains a Kubernetes Deployment resource definition.
Example deployment.yml:
piVersion: apps/v1
kind: Deployment
metadata:
  name: service1-deployment
spec:
  replicas: 3
  selector:
    matchLabels:
      app: service1
  template:
    metadata:
      labels:
        app: service1
    spec:
      containers:
      - name: service1-container
        image: your-dockerhub-username/service1-image:latest
        ports:
        - containerPort: 8000
        imagePullPolicy: Always  # Set the image pull policy to 'Always'
      imagePullSecrets:
        - name: reg-cred  # Reference to the Docker registry secret
Explanation:
imagePullPolicy: Always: This line sets the policy for when to pull the image. In this case, it's set toAlways, which means the Kubernetes deployment will always attempt to pull the latest version of the image.imagePullSecrets:: This section specifies a list of secrets to be used for pulling the image. In your case, it references the Docker registry secret namedreg-cred.
Make sure to replace your-dockerhub-username/service1-image:latest with the actual image reference from your Docker Hub repository. Additionally, ensure that the reg-cred secret is correctly created and exists in your Kubernetes cluster.
Ingress File (ingress.yml)
In Kubernetes, an Ingress resource defines how external HTTP/S traffic should be routed to services within the cluster. The /k8s_manifest/ingress.yml file likely contains an Ingress resource definition.
Example ingress.yml:
apiVersion: networking.k8s.io/v1
kind: Ingress
metadata:
  name: simple-ingress
  annotations:
    kubernetes.io/ingress.class: alb
    alb.ingress.kubernetes.io/scheme: internet-facing
    alb.ingress.kubernetes.io/target-type: instance
    alb.ingress.kubernetes.io/tags: Name=alb
    alb.ingress.kubernetes.io/listen-ports: '[{"HTTPS": 443}, {"HTTP": 80}]'
    alb.ingress.kubernetes.io/certificate-arn: <arn of acm certificate created in AWS>
    alb.ingress.kubernetes.io/healthcheck-path: "/healthz"
spec:
  rules:
    - host: your_domain
      http:
        paths:
          - path: /
            pathType: Prefix
            backend:
              service:
                name: service1
                port:
                  number: 8000
Explanation:
apiVersionandkind: Specifies the type and version of the Kubernetes resource. In this case, it's an Ingress resource.metadata: Contains metadata for the Ingress, such as the name.annotations: Provides additional configuration settings for the Ingress resource.kubernetes.io/ingress.class: alb: Specifies that the Ingress should be handled by the AWS ALB Ingress controller.alb.ingress.kubernetes.io/scheme: internet-facing: Specifies that the ALB should be internet-facing.alb.ingress.kubernetes.io/target-type: instance: Specifies the target type as "instance."alb.ingress.kubernetes.io/tags: Name=alb: Adds tags to the ALB with "Name=alb."alb.ingress.kubernetes.io/listen-ports: '[{"HTTPS": 443}, {"HTTP": 80}]': Configures the ALB to listen on ports 443 for HTTPS and 80 for HTTP.alb.ingress.kubernetes.io/certificate-arn: <arn of acm certificate created in AWS>: Specifies the ARN of the ACM (AWS Certificate Manager) certificate for HTTPS.alb.ingress.kubernetes.io/healthcheck-path: "/healthz": Configures the health check path for the ALB.
spec: Specifies the desired state of the Ingress.rules: Defines a list of host rules for routing traffic.host: your_domain: The domain for which this Ingress rule applies.http.paths: Defines how to route HTTP traffic.path: /: The path pattern to match in the URL.pathType: Prefix: Specifies that the path type is a prefix.backend.service.name: service1: The name of the backend service to route the traffic to.backend.service.port.number: 8000: The port of the backend service to route the traffic to.
This Ingress configuration ensures that traffic directed to your_domain is routed to the service1 on port 8000. Adjust the details according to your specific application requirements. Make sure to replace <arn of acm certificate created in AWS> with the actual ARN of your ACM certificate.
kustomization.yml
1. Manifest Customization:
kustomize is focused on customizing Kubernetes manifests directly. It provides a way to modify existing manifests without using templating engines.
2. Declarative Configuration:
kustomize uses a declarative approach, allowing you to define how to customize manifests in a kustomization.yaml file. It simplifies the process of making targeted changes.
3. Integration with GitOps:
kustomize is often used in GitOps workflows, where you can define your configurations in a Git repository and apply changes to your cluster by updating the repository.
4. Simplicity:
kustomize is often favored for its simplicity and because it doesn't introduce a new language (like Go templating in Helm).
apiVersion: kustomize.config.k8s.io/v1beta1
kind: Kustomization
resources:
- deployment.yml
AWS ALB Ingress Setup
Kustomize Makefile
Create a Makefile in a directory named k8s:
describe_cluster:
        eksctl get cluster --region us-east-1 --name cluster_name

enable_iam_sa_provider:
        eksctl utils associate-iam-oidc-provider --cluster=cluster_name --approve

create_cluster_role:
        kubectl apply -f https://raw.githubusercontent.com/kubernetes-sigs/aws-alb-ingress-controller/v1.1.4/docs/examples/rbac-role.yaml

create_iam_policy:
        curl -O https://raw.githubusercontent.com/kubernetes-sigs/aws-load-balancer-controller/v2.5.4/docs/install/iam_policy.json
        aws iam create-policy \
                --policy-name AWSLoadBalancerControllerIAMPolicy \
                --policy-document file://iam_policy.json

create_service_account:
        eksctl create iamserviceaccount \
      --cluster=cluster_name \
      --namespace=kube-system \
      --name=aws-load-balancer-controller \
            --attach-policy-arn=arn:aws:iam::ACCOUNT_ID:policy/AWSLoadBalancerControllerIAMPolicy \
      --override-existing-serviceaccounts \
      --approve

deploy_cert_manager:
        kubectl apply \
                --validate=false \
                -f https://github.com/jetstack/cert-manager/releases/download/v1.12.3/cert-manager.yaml

deploy_ingress_controller:
        kubectl apply -f v2_5_4_full.yaml

deploy_application:
        kustomize build ./k8s_manifest | kubectl apply -f -

delete_application:
        kustomize build ./k8s_manifest | kubectl delete -f -
How to run makefile:
Navigate to the Directory: Open a terminal and navigate to the directory containing your Makefile and other relevant files.
Run Specific Targets:
To run a specific target, use the
makecommand followed by the target name. For example:make describe_clusterThis will execute the
describe_clustertarget and print the EKS cluster details.Similarly, you can run other targets like
enable_iam_sa_provider,create_cluster_role, etc.
Post Steps:
The provided steps are post-installation tasks for the AWS ALB Ingress Controller (v2.5.4). Here's a breakdown of each step:
Remove ServiceAccount Section:
sed -i.bak -e '596,604d' ./v2_5_4_full.yaml- This command uses
sedto delete lines 596 to 604 in thev2_5_4_full.yamlfile, effectively removing the ServiceAccount section from the manifest.
- This command uses
Replace Cluster Name Placeholder:
sed -i.bak -e 's|your-cluster-name|my-cluster|' ./v2_5_4_full.yaml- This command replaces all occurrences of
your-cluster-namewithmy-clusterin thev2_5_4_full.yamlfile. You should replacemy-clusterwith the actual name of your EKS cluster.
- This command replaces all occurrences of
Download IngressClass Manifest:
curl -Lo v2_5_4_ingclass.yaml https://github.com/kubernetes-sigs/aws-load-balancer-controller/releases/download/v2.5.4/v2_5_4_ingclass.yaml- This command downloads the IngressClass manifest (
v2_5_4_ingclass.yaml) from the specified GitHub release.
- This command downloads the IngressClass manifest (
Apply IngressClass Manifest:
kubectl apply -f v2_5_4_ingclass.yaml- This command applies the downloaded IngressClass manifest to your Kubernetes cluster. IngressClass is a resource that specifies the class of the Ingress controller to use.
Verify Controller Installation:
kubectl get deployment -n kube-system aws-load-balancer-controller- This command checks the status of the deployment named
aws-load-balancer-controllerin thekube-systemnamespace. It verifies whether the controller has been successfully deployed.
- This command checks the status of the deployment named
After performing these steps, you should have the AWS ALB Ingress Controller configured and running in your EKS cluster. Make sure to monitor the deployment for any issues and troubleshoot if necessary.
Key Requirements and Considerations
The provided text describes specific requirements and considerations for setting up the AWS ALB (Application Load Balancer) Ingress Controller in an Amazon EKS (Elastic Kubernetes Service) cluster. Let's break down the key points:
Cluster Requirements:
At least two subnets in different Availability Zones with a minimum of eight available IP addresses.
Proper tagging of subnets for internal and external load balancers.
Tagging of security groups attached to worker nodes.
Subnet Role Tags:
Private subnets should be tagged with
kubernetes.io/role/internal-elb: 1.Public subnets should be tagged with
kubernetes.io/role/elb: 1.
Ingress Annotation:
- Ingress resources that use the AWS ALB Ingress Controller should have the annotation
kubernetes.io/ingress.class: albto ensure they are processed by the controller.
- Ingress resources that use the AWS ALB Ingress Controller should have the annotation
IPv6 Support:
- If load balancing to IPv6 Pods, an additional annotation
alb.ingress.kubernetes.io/ip-address-type: dualstackis required.
- If load balancing to IPv6 Pods, an additional annotation
Traffic Modes:
- Two traffic modes are supported: "Instance" (default) and "IP." Specify the mode using the
alb.ingress.kubernetes.io/target-typeannotation.
- Two traffic modes are supported: "Instance" (default) and "IP." Specify the mode using the
ALB Tagging:
- To tag ALBs created by the controller, use the
alb.ingress.kubernetes.io/tagsannotation.
- To tag ALBs created by the controller, use the
Ingress Groups:
Ingress resources can be grouped using the
alb.ingress.kubernetes.io/group.nameannotation.Priority within a group can be specified using
alb.ingress.kubernetes.io/group.order.
Upgrading/Downgrading:
- Upgrading or downgrading the ALB controller version may introduce breaking changes. Check release notes for details.
Security Warning:
- When using ingress groups, be cautious about specifying a group name to prevent undesired behavior, especially in a multi-user environment.
For detailed guidance on configuring the AWS ALB Ingress Controller in Amazon EKS, refer to the official AWS documentation:
Following these requirements ensures a seamless integration between Kubernetes and AWS resources, facilitating effective load balancing of traffic across different Pods within the EKS cluster.
Conclusion
Congratulations! You've successfully set up AWS ALB Ingress in your Kubernetes cluster on Amazon EKS. This comprehensive guide walked you through each step, providing detailed explanations and insights into the configurations.
Happy Kubernetes-ing! 🚀